

This was game 2 with my Tyranids and by now I’ve painted enough to get me up to 1500 points, so took the new guys for a spin in a slightly larger battle.
The Armies
Tyranids (Invasion Fleet): Hive Tyrant, Neurotyrant + 3 Zoanthropes, Broodlord + 5 Genestealers, Norn Emissary, Screamer Killer, Exocrine, Biovore, 10 Neurogaunts, 10 Termagants, 10 Hormagaunts, 5 Barbgaunts, 3 Von Ryan’s Leapers
Adeptus Mechanicus (Cohort Cybernetica): Cybernetica Datasmith + 4 Kastelan Robots, Tech Priest Enginseer, 2 x Onager Dunecrawler, 3 Sydonian Dragoons, 5 Sicarian Infiltrators, 2 x Ironstrider Ballistari, 10 Skitarii Vanguard, Scorpius Dunerider + 10 Skitarii Rangers
The Mission
We drew from the Pariah Nexus deck and got Supply Drop, Crucible of Battle, Rapid Escalation.

Deployment

Rolling for the order the objectives would vanish in, the order was middle, top (in these images), bottom. This was slightly unfortunate, since I’d put most of my heavy-hitters at the other end of the table from the all-important third objective.
The Game
Turn 1
I won the roll-off and got first turn (which I didn’t really want). Most of my army shuffled into the mid-ground, careful to stay out of line of sight but the Screamer Killer headed up the southern flank and my Exocrine came forwards far enough to take a shot at one of the Dunecrawlers, only doing minimal damage. Nothing else had line of sight. The Leapers charged into the Sicarians for some Infiltrator v Infiltrator action but the end result was a lost model each.

In the AdMech’s turn the Dunecrawlers atomised the over-eager Exocrine and a spore mine and the Dunerider and its passengers gunned down the last two Leapers and took control of the South objective.
Tyranids: + 3 (Sabotage) = 3
AdMech: + 4 (No Prisoners) + 2 (Secure No Man’s Land) = 6
Turn 2
The Tyrant moved up to take the North objective. The Barbgaunts moved into the ruins and fired on the Dragoons, managing to chip a few wounds off. The Genestealers zipped forwards across the central avenue and charged into the Dragoons, finishing off the injured one and killing another, causing an explosion that damaged most of the surrounding AdMech forces. The screamer-killer charged onto the South objective, carving through most of the Ranger squad. The Norn began its long trek down towards that objective – its singular purpose in life.

The Neurogaunts moved onto the centre objective but were barbecued by the Robots, who then followed up by charging into the Barbgaunts, doing enough damage to kill them three times over and consolidating back onto the central objective. The Genestealers were killed by a combination of shooting and Fall Back & Charge shenanigans from the last Dragoon, leaving only the Broodlord. To the south, the Infiltrators and Dunerider toed into the objective, taking control but keeping their distance from the Screamer Killer. The Ballistarii (Ballistariusses? Ballistariii?) came out of reserves into the two western corners of the battlefield to score Containment.
Tyranids: 3 + 4 (Storm Hostile Objective) + 3 (Behind Enemy Lines) = 10
AdMech: 6 + 5 (Primary) + 2 (Cleanse) + 6 (Containment) = 19
Turn 3
The Screamer Killer trashed the Dunerider and the Hormagaunts arrived from reserves in the south-east corner and made a 9″ charge into the Infiltrators, killing 2 of them but losing 4 in return. The Zoanthropes finally got a shot on something, doing some damage to the robots in conjunction with a shot from the Norn but not enough to kill one. The Termagants moved out of cover with the intent of blocking the Robots’ path to the Norn but were immediately burninated in overwatch.

The northern Ballistari came around the corner to target the Zoanthropes but died to overwatch from the Neurotyrant. The Dunecrawlers gunned down the Screamer Killer and Broodlord and the Dragoon and Infiltrators finished off the Hormagaunts. The Norn was now the only thing left with a reasonable chance of getting to the key southern objective. The robots took off four wounds off it with their flamers but failed their charge. The Norn lived!
Tyranids: 10 + 5 (Primary) + 2 (Bring it Down) = 17
AdMech: 19 + 5 (Primary) + 5 (Extend Battle Lines) + 3 (Overwhelming Force) = 32
Turn 4
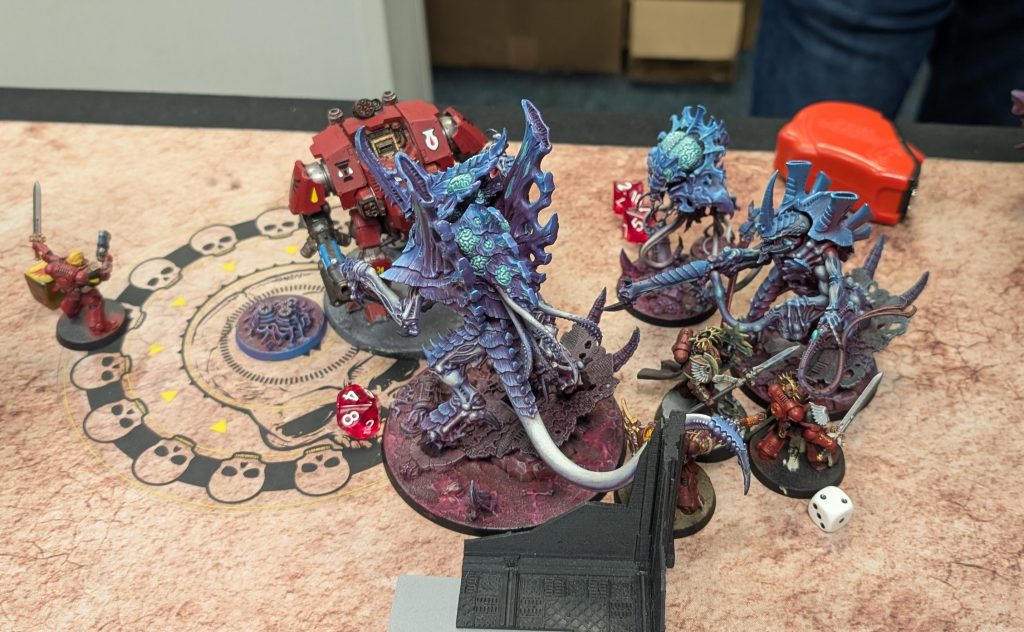
At the start of turn 4 the middle objective vanished. The Zoanthropes and Norn blasted the robots with their psychic lascannons and finally managed to bring one down. Only three more to go. The Norn then charged the Infiltrators, finally killing them and reaching the objective. Its Singular Purpose thus realised it powered up into its final form, gaining a 5+ Feel No Pain and an OC bonus that left it easily in control of the objective.

The Robots chased after the Norn, burning a few more wounds off but again failing their charge. The Dunecrawlers did some more damage, taking the Norn down to just 6 wounds. The final Dragoon bravely charged in but did no more damage and was cut down by the Norn’s talons.
Tyranids: 17 + 8 (Primary) + 5 (Secure No Man’s Land) = 30
AdMech: 32 + 5 (Marked For Death) = 37
Turn 5
At the start of turn 5, the northern objective vanished and the final remaining one became worth 15VP, which thanks to the Norn I scored. This put me into the lead and meant that I could still win this if only I could prevent the AdMech from taking that objective before the end of their turn. This meant keeping the Norn alive and that meant blunting the edge of the inevitable Robot rumble as much as possible. So, everything fired into the Kastelans and the Norn charged them (a calculated(ish) risk), keeping a thin sliver of base on the objective and also moving out of line of sight of the Dunecrawlers.

The end result was the destruction of all but one robot and the AdMech counterattack taking the Norn down to just one remaining wound. But, the Norn lived, and the objective was denied to the AdMech, winning me the game by the narrowest of narrow margins!

Final Scores
Tyranids: 30 + 15 (Primary) + 10 (Paint) = 55
AdMech: 37 + 10 (Paint) = 47
Tyranid Victory! (Ptui! Ptui!… Why does this biomass have all these weird metal bits in it…?)
Post-Mortem
- This was a victory, but an extremely narrow one that would have been a resounding defeat but for a single wound. I owe my victory far more to luck than judgement – this was a gift of the dice rather than anything I feel particularly earned. In particular if either of the Robots’ (fairly short) charges into the Norn had succeeded it would’ve been pulp and the game would’ve been lost.
- I made less rules mistakes than last time, partly due to having done some more revision of the rules but mainly because my opponent was a seasoned pro who gently put me back on the right track whenever I did anything stupid. However, there were two errors I realised after the game. Most importantly, I forgot to take a battleshock test for the Norn Emissary at the start of Turn 5, who was below half wounds at that point. Given both the importance of it staying un-battleshocked and the fact that I had CP to spare if I had remembered I would’ve used Insane Bravery to auto-pass anyway, so the end result would have been the same besides finishing with one less CP. But, it was still accidental cheating and I am a naughty boy. I need to get into the habit of rigorously checking for battleshock every turn. (In mitigation, this would’ve been the first battleshock test I would have had to have taken all game – the AdMech had otherwise been ruthlessly efficient at humanely dispatching whole units before they got a chance to be battleshocked.) The other notable mistake was forgetting about the +1 to hit that the Neurotyrant should have given the Zoanthropes, which may have made them a bit more effective and was especially dumb considering it was the whole point of putting them together in the first place.
- Moving onto tactical errors; I made a lot. The biggest was probably deployment – I put all my heavy-hitters on one end, which turned out to be the wrong end.
- The Zoanthropes in particular were in a bad position and couldn’t shoot anything until Turn 3.
- Moving the Exocrine so far forwards was a mistake and just made it an easy target. Just because the Hive Tyrant gives a bubble of advance + shoot doesn’t mean it’s necessarily a good idea to advance + shoot.
- The Von Ryan’s Leapers didn’t do much. I counter-deployed them to take on the enemy Infiltrators but they weren’t particularly effective. It may have been better to just pop them on the North objective behind a wall to force something to charge them (and suffer their Fights First).
- The Hive Tyrant felt underutilised, since it mostly just sat on the North objective all game. But in doing so it did single-handedly score me 15 points, presumably dissuaded my opponent from trying to take that objective and the free stratagems helped out at least the Zoanthropes. It might have been better placed more centrally so it could support more of the army, but hard to say.
- Kastelan Robots are scary, especially when buffed. Their flamers will eradicate chaff units instantly and their fists will obliterate tougher stuff with ease. So, it was difficult to know how to deal with them. My general plan was to try to wear them down with anti-tank fire and then finish them off with a monster in melee, which is sort-of what happened but not until very late in the game; up until that point I had little option but to try to avoid them at all costs.
- I’m not quite sure what it says about me that my general approach is to run away from things. (Hey! It works!)
- My various kinds of chaff-gaunts did pretty much nothing. The Termagants and Neurogaunts weren’t even a minor speedbump for the Robots. The Hormagaunts did slightly better but still didn’t kill enough to make their points back. Dying is of course the point of these units, but ideally they should be doing something useful while dying. Invasion Fleet does have a stratagem to regen them, but that would involve them taking some damage but surviving until the next command phase, which seems like a fairly unlikely scenario.
- My Stratagem use was OK, but could’ve been better, especially since I ended with some spare CP (I guess I need to change the name of the blog now). Adrenal Surge on the Genestealers may have helped deal with the Dragoons more quickly. I’m considering giving Crusher Stampede a try instead of Invasion Fleet – the ability to smash through walls with my monsters would have been quite handy in this game.


Leave a comment